This is the second article in our series on Priority cleanup. Consider checking the first part for introduction on the feature and the third part for details on monitoring, audit trail and some additional remarks.
How priority cleanup policies work on the backend
After submitting the policy, it will take some time for it to be deployed. On the backend, a new retention compliance policy object is created, along with an accompanying retention rule. Both are of special, newly introduced type, PriorityCleanup. To get their properties, you can connect PowerShell to the Compliance endpoint and use the familiar retention cmdlets with the –PriorityCleanup switch. Here are some examples:
#List all priority cleanup policies
Get-RetentionCompliancePolicy -PriorityCleanup

Name Workload Enabled Mode
---- -------- ------- ----
Test Exchange policy Exchange, SharePoint, OneDriveForBusiness, Skype, ModernGroup, DynamicScope True Enforce

#Get the properties of a specific priority cleanup policy, including its distribution details:
Get-RetentionCompliancePolicy "Test Exchange policy" -PriorityCleanup -DistributionDetail | select ExchangeLocation*,IsSimulation,PriorityCleanup,Enabled,Mode,DistributionStatus,Guid

ExchangeLocation : {Vasil Michev}
ExchangeLocationException : {}
IsSimulation : False
PriorityCleanup : True
Enabled : True
Mode : Enforce
DistributionStatus : Success
Guid : a1bd912d-8e1f-4c38-bed1-b422f23a05d2

#Get the retention compliance rule object corresponding to the above policy
Get-RetentionComplianceRule -Policy a1bd912d-8e1f-4c38-bed1-b422f23a05d2 -PriorityCleanup | select ContentMatchQuery,ApplyComplianceTag,RetentionComplianceAction,PriorityCleanup,Policy,Disabled,Mode,Guid

ContentMatchQuery : (itemclass:IPM.Post.Rss) AND (from:'Xbox Wire') AND (sent>=2010-01-01 AND sent<=2023-04-01)
ApplyComplianceTag : aa1511c5-3aa9-456a-9c9d-345beb91b2dd
RetentionComplianceAction : Delete
PriorityCleanup : True
Policy : a1bd912d-8e1f-4c38-bed1-b422f23a05d2
Disabled : False
Mode : Enforce
Guid : ccf78ae8-5603-45da-a37a-30f607d6bdff

#List all priority cleanup rules
Get-RetentionComplianceRule -PriorityCleanup
If you examine closely the properties of the retention compliance rule, you will notice that the ApplyComplianceTag property has a value, even though we didn’t define any tags during the creation process. What we did do is define a KQL query to match the items, which in turn gets represented by a compliance tag object on the backend, and corresponding rule for publishing the tag. As you can notice from the below, the tag is what’s responsible for the actual approvals, and the subsequent (immediate) deletion of items:
Get-ComplianceTag aa1511c5-3aa9-456a-9c9d-345beb91b2dd -PriorityCleanup | select Name,RetentionAction,RetentionType,RetentionDuration,MultiStageReviewerMetadata,PriorityCleanup,ImmutableId

Name : Test Exchange policy
RetentionAction : Delete
RetentionType : CreationAgeInDays
RetentionDuration : -1
MultiStageReviewerMetadata : {"MultiStageReviewSettings":[{"StageId":"bdb0555d-a894-4ba1-bd3e-38ff3d53534e","StageName":"Priority cleanup admins","Reviewers":["userA@tenant.onmicrosoft.com"]},{"StageId":"25617147-508a-44be-8bca-5017994afa51","StageName":"Retention managers","Reviewers":["userB@domain.com"]},{"StageId":"abd526ca-7767-4209-a2c2-948bfd9d181b","StageName":"eDiscovery admins","Reviewers":["userC@domain.com"]}]}
PriorityCleanup : True
ImmutableId : aa1511c5-3aa9-456a-9c9d-345beb91b2dd
Note the Name value of the compliance tag. It matches the name of the “parent” priority cleanup policy, and as tag names are unique within the tenant, it gives us another identifier to use with the cmdlets. More importantly, the Name value is what we can use for compliance searches employing the complianceTag keyword, as the GUID value will not work!
Of course, the compliance tag gets its own retention compliance policy and rule objects as well, but the properties of those do not reveal any additional information, so we can ignore them. To summarize, the policy object defines the locations to cover and the overall state of the policy, the rule is responsible for matching items within those locations and the compliance tag defines the action taken on any matched items, including gathering the needed approvals beforehand.
Most of this complexity is hidden from the UI, but I believe it is important to have some additional understanding on how the priority cleanup feature works on the backend. Knowing the moving parts and the corresponding PowerShell cmdlet to make changes to them allows you to address some scenarios not exposed within the UI, such as targeting shared mailboxes. For example, the following cmdlet can be used to add a specific shared mailbox to an existing priority cleanup policy:
Set-RetentionCompliancePolicy -Identity a1bd912d-8e1f-4c38-bed1-b422f23a05d2 -AddExchangeLocation shared@domain.com -PriorityCleanup
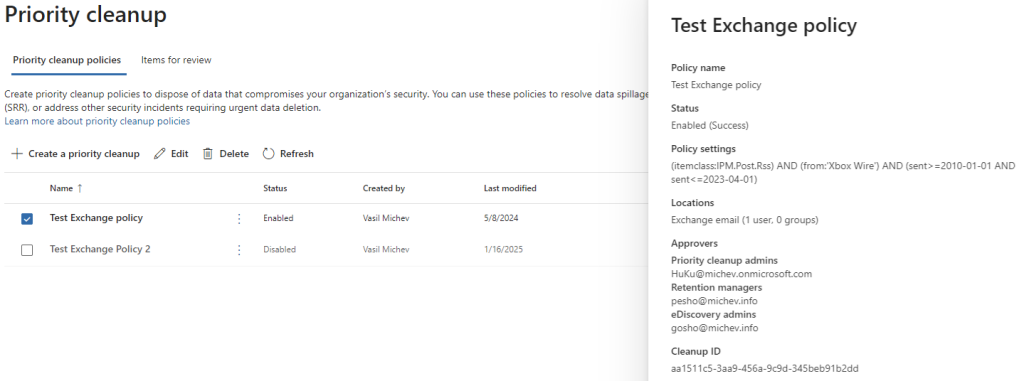
The UI does expose the compliance tag GUID via the Cleanup ID field, which you can spot at the bottom of the policy info pane. As you can see on the screenshot below, the pane exposes a combination of properties across the priority cleanup policy, rule and compliance tag. This might be a bit misleading if you are not familiar with how the feature works, so hopefully the PowerShell examples above help you understand the data presented on the pane. Obviously the GUID value visible under the Cleanup ID field will not match the policy (or rule) ID. On the other hand, the tag GUID is what you will notice across (most) audit log entries related to the priority cleanup process, as we will see below.
 Before we move on to the reviewer experience, let us also talk how individual items are processed by priority cleanup. The easiest way to do this is to review item’s properties via the MFCMAPI tool. As items get processed by the MFA, if they match the KQL query used by the policy, the ComplianceTag property will be stamped on the item. Four additional properties are responsible for the review/approval process, all designated via the {403FC56B-CD30-47C5-86F8-EDE9E35A022B} Named property GUID. Those are: RecordReviewStage, RecordReviewStageInfo, TagsReplacedByPriorityCleanup and TriggerFlowStage.
![]() Every item that is under the scope of a (active) priority cleanup policy should have the ComplianceTag property stamped on it, with value pointing to the name of the compliance tag. As we mentioned above, the Name value of the tag is actually used throughout the compliance stack, not its GUID. If a policy is disabled or deleted, the corresponding ComplianceTag property is stripped from any previously tagged items, after the MFA has processed them, that is. In contrast, the other four tags do not seem to be removed from the item, even for deleted policies.
Every item that is under the scope of a (active) priority cleanup policy should have the ComplianceTag property stamped on it, with value pointing to the name of the compliance tag. As we mentioned above, the Name value of the tag is actually used throughout the compliance stack, not its GUID. If a policy is disabled or deleted, the corresponding ComplianceTag property is stripped from any previously tagged items, after the MFA has processed them, that is. In contrast, the other four tags do not seem to be removed from the item, even for deleted policies.
![]() You might also notice that the “tag” value (second column) for the same property can differ between items… not sure what this is all about.
You might also notice that the “tag” value (second column) for the same property can differ between items… not sure what this is all about.
Reviewer experience
Once a priority cleanup policy has been created, enabled and (hopefully) successfully distributed across all relevant mailbox locations, items will start matching. In turn, the process is now in the hands of the approvers we designated earlier. As with any other compliance related processing, the Managed Folder Assistant is responsible for discovering and stamping each item within the affected mailboxes. Remember that the assistant runs on a 7-day workcycle in Exchange Online, so it might take a while before items start appearing for approval. Running the Start-ManagedFolderAssistant cmdlet might help speed things up a bit, but the SLA remains at 7 days.
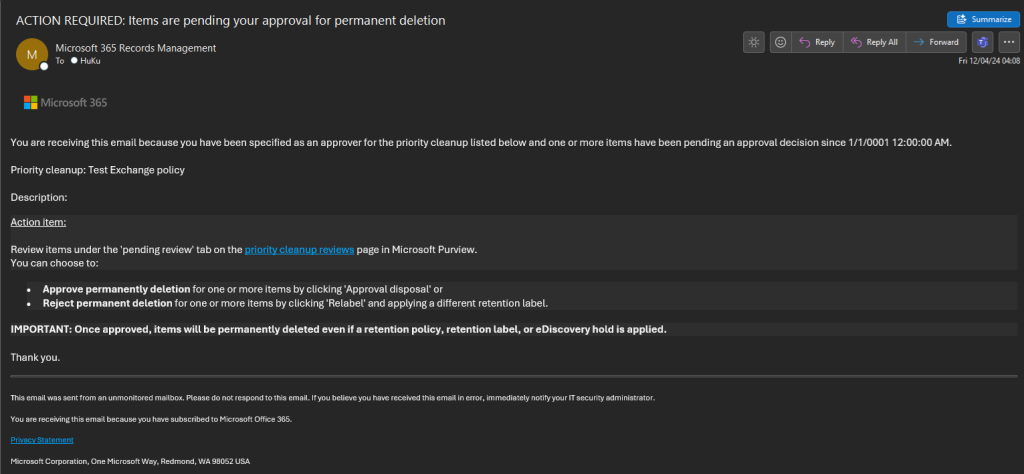
Any matched item will then appear for review, to be performed by the designated approvers. The first-stage approval is done by the Priority cleanup admins, and the process itself should be familiar to anyone that has delved in disposition reviews and similar. Users in the designated role will be notified about any pending approvals via email (see screenshot below). They can also access the Items for review tab under the Priority cleanup page in the Purview portal, where they will find listed all Priority cleanup policies assigned to them. Of course, you need to make sure the correct permissions have been granted to the approver, as described earlier. Clicking the Open in new window button will start the review process.
 As mentioned above, the process is very similar to that of disposition review, and so is the UI. In fact, it uses the exact same UI, with some controls and actions disabled. As the feature currently only supports Exchange Online, the Source dropdown controls is not available, and neither are Filters. Instead, you are directly presented with all matching Exchange items. As the UI loads items in batches of 20, and only loads up to 80 items initially, the process of reviewing large number of items can be a bit annoying. On the other hand, the assumption here is that you want to review each and every item and not blindly perform bulk actions. Still, this is one place where the process can be streamlined, even though we cannot blame this purely on the Priority cleanup feature, as “regular” disposition suffers from the same issues.
Some shortcomings of the review experience
Speaking of improvements, at most 1000 items can be processed per MFA run. In other words, if you create a policy with query that exceeds this limit, both the UI and the exported CSV file will show exactly 1000 items after the initial processing. The number will steadily increase with each additional processing of the mailbox(es) in scope. As you can imagine, this behavior can be a bit misleading. Yet, nowhere in the review (or creation) process you are notified about this limit. Combine this with the aforementioned lack of estimates for the number of items to be processed, and you can see how a reviewer can be left with the wrong impression on the scope of a given cleanup operation.
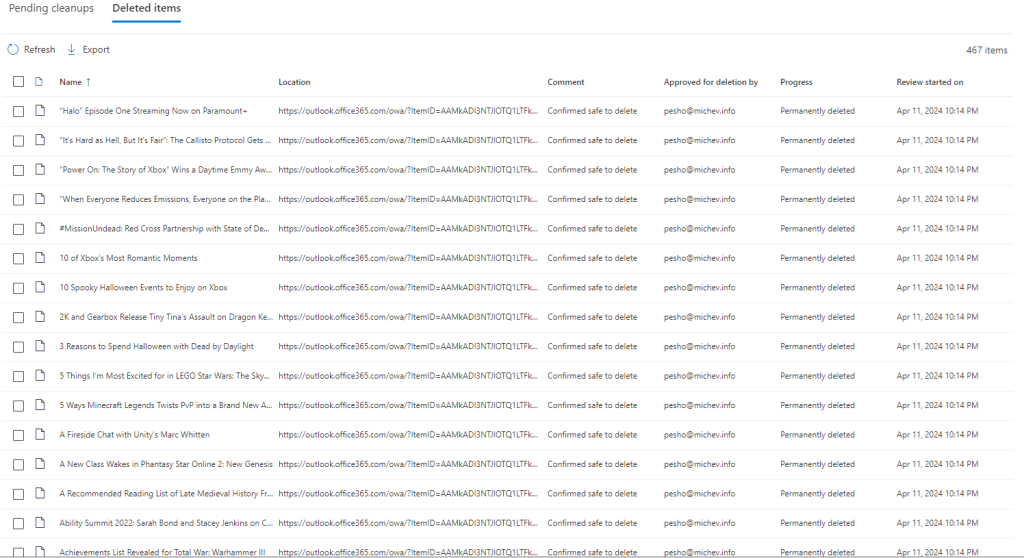
The level of detail exposed within the review experience can also be improved. The mailbox in which tagged items are located is indicated by the values of the Sender and/or the Applied by columns, another bit that is quite misleading. Same goes for ExpiryDate, which designates the date the item was received, if anything. The Location property on the other hand is populated by deeplink to open the item in OWA, which is of zero value. And on the Deleted items page, items show even less detail, to a point where it’s plain impossible to understand which mailbox a given item belonged to. I strongly believe the feature can benefit from better insights and reporting.
Taking actions on items
On to actions. You can either Approve disposal or Relabel items by hitting the corresponding button on top. Both actions require you to provide comment/justification for the operation. The remaining buttons allow you to Refresh the list of items or Export it. Once any of the designated Priority cleanup admins perform the initial approval, items are moved to the second stage, where either the Retention managers or eDiscovery managers will have to process items, depending on the set of holds and retention policies applied. After all approvals have been gathered, will be moved under the Deleted items tab, with a status of Approved for deletion. The actual deletion will happen after some additional MFA processing, during which the Progress status changes to Awaiting deletion and finally to Permanently deleted.
 Note that there is no option to “undo” the cleanup operation, deletions are final. This in turn makes the job of the approvers that more important. Another thing to note is that there is no way for reviewers to hide/remove certain item from view. One can argue that the Relabel operation is the obvious solution here, but that does not fully address the “do not touch this item” type of scenario, as label-less policies are still a thing. And when both the available actions are not appropriate, items will just remain in the view, which already suffers from some performance/usability issues, as discussed above.
This concludes our second part in the series on the Priority cleanup feature. In the last part, we will cover disabling and deleting policies, how to monitor the progress and work with the audit trail and provide some final remarks.
2 thoughts on “Priority cleanup enables removal of items on hold from Microsoft 365 mailboxes (part 2)”